Apogee Quartet User's Guide
Browse online or download User's Guide for Serial switch boxes Apogee Quartet. Apogee Quartet User`s guide User Manual
- Page / 68
- Table of contents
- TROUBLESHOOTING
- BOOKMARKS
- Apogee Quartet 1
- Contents 2
- Operation! 17 3
- Maestro 2! 33 3
- Applications! 51 4
- Troubleshooting! 60 5
- Specifications! 63 5
- QuickStart 6
- Package contents 7
- Quartet panel tour 8
- Rear panel 9
- Side panel 9
- Display and touchpad tour 10
- Connecting to your Mac 11
- Adjusting Volume 14
- Headphone Output level 15
- Configuring the Input 16
- Operation 17
- Input level 18
- Speaker Output level 19
- Headphone Output level 20
- 2 Speaker Sets 22
- 3 Speaker Sets 23
- Custom Output Routing 24
- Assignable Touchpads 25
- Mute outputs 26
- Dim outputs 26
- Sum to Mono 27
- Engage Speaker Set 27
- Clear Meters 28
- MIDI Input/Output 29
- OS X System Preferences 31
- OS X Audio MIDI Setup 31
- Setting Sample Rate 32
- Maestro 2 33
- Device Icon & ID Button 34
- Input Tab Window 35
- Output Tab Window 36
- Device Settings Tab Window 38
- Output Routing Tab Window 39
- Mixer Tab Window 40
- System Setup Window 41
- Menu Bar Menus 42
- Menu Bar Menus (continued) 43
- Low Latency Mixing 45
- Do I need the Maestro Mixer? 48
- Recording software settings 48
- Software monitoring 48
- Playback mix 49
- Maestro Output Routing Tab 49
- Maestro Mixer Settings 50
- Software Setup 51
- Now Input 1 52
- A Inst 1 52
- Using Quartet with GarageBand 55
- (9 or greater) 56
- Choose Live > Preferences 57
- Troubleshooting 60
- Apogee Product Repair 62
- Specifications 63
- System Requirements: 64
- Warranty & Notifications 65
- Service Information 66
- Warnings 66
- Copyright Notice 66
- Software Notice 67
- Declarations of Conformity 67
- Industry Canada Notice 68
Summary of Contents
Apogee Quartet User’s GuideV1, September, 2012
Display and touchpad tourInput display and touchpadsOutput display and touchpadsQuickStart - Apogee Quartet User’s GuideVersion 1, September 2012
Connecting to your MacSystem Requirements•Intel Mac 1.5 GHz or faster•Mac OS X 10.6.8, 10.7.4 or greater•2 GB minimum RAM, 4 GB recommendedInstall Qua
Choosing Quartet for Mac Sound I/OAfter connecting Quartet to your Mac, a dialog box will prompt you to choose Quartet for Mac sound input and output.
Connect to Headphones or SpeakersConnect headphones to the headphone output on the right side of Quartet.Connect Quartet’s 1/4” speaker outputs 1-2 t
Adjusting Volume Speaker Output level To change Quartet’s speaker output level (i.e the listening level of connected speakers), press the Speaker Sele
Headphone Output level To change Quartet’s headphone output level (i.e the listening level of connected headphones), press the Headphone Selection To
Configuring the InputConnect a microphone or instrument to one of the combo jacks on the rear panelOpen Apogee Maestro 2 software and select the Input
OperationController KnobQuartet’s Controller Knob allows you to easily adjust the levels of all inputs and outputs and also provides a quick and easy
Adjusting Input & Output Levels!Input levelTo change Quartet’s input level (i.e the preamp gain of microphones and instruments):1) Press the Touch
Speaker Output levelTo change Quartet’s speaker output level (i.e the listening level of connected speakers):1) Press the speaker output Touchpad. The
ContentsQuickStart! 6Introduction! 6Quartet! 6Professional audio interface and studio control center for Mac! 6What you can do with Quartet:! 6Package
Headphone Output levelTo change Quartet’s headphone output level (i.e the listening level of connected headphones): 1) Press the headphone output Touc
Multiple Speaker Set OperationQuartet’s Speaker Set functionality allows you to connect up to 3 stereo speaker sets, each of which can be individually
2 Speaker SetsWhen the “2 Speaker Sets” option is selected, Software Outputs 1-2 are routed to Hardware Outputs 1-2 and 3-4. (as shown in the Routing
3 Speaker SetsWhen the “3 Speaker Sets” option is selected, Software Outputs 1-2 are routed to Hardware Outputs 1-2, 3-4, and 5-6. (as shown in the Ro
Custom Output RoutingThe Output Routing can be freely changed if you have a unique setup. For instance, if you wish to listen to your DAW’s Software O
Assignable TouchpadsQuartet's three assignable Touchpads can be setup for quick access to Output functions. Use them to mute or dim the outputs,
Mute outputsYou can assign one of the three Touchpads to mute the Speaker, Headphone or All Outputs. Dim outputsThe Dim function lowers the output vol
Sum to MonoThe Sum to Mono function is used to examine phase relationships on stereo tracks. When engaged, the left and right output signals are combi
Clear MetersThe Clear Meters function will remove any peak and over indicators in Maestro 2 and OLED meters on Quartet’s front panel. If “Peak Hold”
MIDI Input/OutputQuartet’s USB MIDI input/output provides a MIDI connection between class compliant Core MIDI devices such as keyboards and other cont
Headphone Output level! 15Configuring the Input! 16Open Apogee Maestro 2 software and select the Input tab.! 16Operation! 17Controller Knob! 17Quartet’
To setup a MIDI device with Quartet:Using a standard USB cable, connect the device’s USB MIDI connector to Quartet’s rear panel MIDI USB connector.In
OS X System PreferencesThe OS X System Preferences Sound window provides settings to choose Quartet for Mac sound input and output. If you’ve already
Setting Sample RateQuartet operates at all standard sample rates between 44.1 kHz and 192 kHz. In most cases, the sample rate is set by the audio appl
Maestro 2Apogee’s Maestro 2 software provides the most complete control of Quartet, including:•Control of all settings•Store/recall of configurations•L
Device Icon & ID ButtonA device icon and ID button is placed adjacent to each row of parameters to identify the hardware unit to which the row bel
Input Tab Window1. Device Icon & ID Button - see the description above.2. Analog Level - Use this menu to select mic, instrument, or line input.3.
Output Tab Window1. Device Icon & ID Button - see the description above.2. Analog Output Meter - This meter displays the level of the analog outpu
to mono and check for unevenness in the frequency range caused by phase cancellation and reinforcement of particular frequencies. If the sound changes
Device Settings Tab Window 1. Device Icon & ID Button - see the description above.2. Peripheral Prex - Use this drop down menu to assign a letter
Output Routing Tab Window In the Maestro Output Routing tab, route Mixer 1 (or Mixer 2) to Line 1/2. If Analog Out Format is set to 2 or 3 Speaker Se
Devices Sidebar! 33Device Icon & ID Button! 34Input Tab Window! 35Output Tab Window! 36Device Settings Tab Window! 38Output Routing Tab Window! 39
Mixer Tab WindowUse the Mixer Tab Window to adjust the Mix of input and output signals as well as configure Low Latency Mixing. Learn more about Low La
System Setup Window1. Sample Rate - This drop down selects the sample rate. Under certain circumstances, (for example, when a DAW session is open) thi
Menu Bar MenusAbout Apogee Maestro - Choose this menu item to display version information.Preferences - Choose this menu item to display Maestro’s Pre
Menu Bar Menus (continued) Rescan - Choose this menu item to re-initialize the link between Maestro software and Apogee hardware connected to the Mac,
Menu Bar Menus (continued)Help - Choose this menu item to open Maestro Help for any Apogee hardware devices connected to your MacMaestro 2 - Apogee Qu
Low Latency MixingWhile recording, if you notice a delay between the moment you play or sing a note and when you hear it in your headphones you are ex
Maestro Low Latency mixing (continued)Figure ATo illustrate the effect of latency, Figure A depicts the typical signal path of a vocal overdub session.
Maestro Low Latency mixing (continued)Figure BBy routing the hardware input directly to the hardware output and mixing in playback as shown in Figure
Working with the Maestro MixerDo I need the Maestro Mixer?The Maestro mixer serves to provide a low latency monitoring mix while recording. Therefore
Playback mixIn your recording software, set up a mix of all playback tracks and route it to the first pair of outputs. If a master fader controls the g
Using Quartet with Steinberg Nuendo! 59Troubleshooting! 60Further Troubleshooting Resources! 62Apogee Website! 62Apogee Support! 62Apogee Product Repa
Maestro Mixer SettingsNow select the desired input (Line, Mic or Instrument) and set the Input Level on the Input tab; the signal should be displayed
Software SetupUsing Quartet with Logic IMPORTANT NOTE! The Apogee Control Panel within Logic is not compatible with Quartet.Go to the Logic Pro or Log
Using Quartet with Logic (continued)By selecting Quartet input and output labels in Logic, the labels you see in Logic’s Channel Strip input and outpu
Using Quartet with Logic (continued)Now close the Logic Pro Preferences window and select New > Empty Project > from the File Menu.If you are re
Using Quartet with Logic (continued)Logic will now ask you to name the project and save in on your hard drive.Click the Record button in the transport
Using Quartet with GarageBand! IMPORTANT NOTE! The Apogee Control Panel within GarageBand is not compatible with Quartet.If you don’t have Quartet con
Using Quartet with Avid Pro Tools (9 or greater)Choose Setup menu > Playback Engine.Choose Quartet for Current Engine. Set the Buffer Size
Using Quartet with Ableton LiveChoose Live > PreferencesClick on the Audio tab. Select CoreAudio in the Driver Type menu. Select Quartet in both th
Using Quartet with Apple Final Cut Pro!Choose Final Cut Pro > Audio/Video Settings.!Click on the A/V Devices tab. Select Quartet in the Audio menu.
Using Quartet with Steinberg NuendoChoose Devices > Device SetupIn the Devices window, click on VST Audio System. Select Quartet in the ASIO menu.O
QuickStartIntroductionThank you for purchasing Quartet. This QuickStart guide describes how to set up Quartet with your Mac, connect speakers or headp
TroubleshootingLooking for answers? Ask the knowledgebasewww.apogeedigital.com/knowledgebaseQuartet FAQsQ: When I press the Speaker touchpad, nothing
Symptom: The audio quality is compromised (distortion, choppy audio, "buzzy" audio). Solution: There are several remedies for audio that is
Further Troubleshooting ResourcesIf you still haven't found a resolution to your issue, Apogee provides a wide range of resourcesApogee WebsiteFo
SpecificationsFeaturesQuartet!Computer ConnectivityUSB 2.0 High SpeedRoundtrip Latency performance32 bu"er @ 96kHz = 3.6 ms64 bu"er @ 44.1kHz
Phase InvertSoft LimitGroup Inputs2 groupsMute OutputsSum to MonoDim OutputsCore Audio Compatible!System Requirements:•Computer: Intel Mac 1.5GHz or f
Warranty & Notifications Registration and Warranty InformationTo receive free tech support, important information and product updates rst... Regis
Service InformationThe Quartet contains no user-serviceable components; refer to qualified service personnel for repair or upgrade. Your warranty will
Software NoticeRedistribution and use in source and binary forms, with or without modification, are permitted provided that the following conditions ar
Apogee Electronics Corp.1715 Berkeley StreetSanta Monica,CA 90404, USAIndustry Canada NoticeThis Class B digital apparatus meets all requirements of t
Package contentsThe following items are included in the Quartet box: •Quartet •QuickStart Guide •Power Supply•USB 2.0 Cable USB 2.0 CableQuickStart Gu
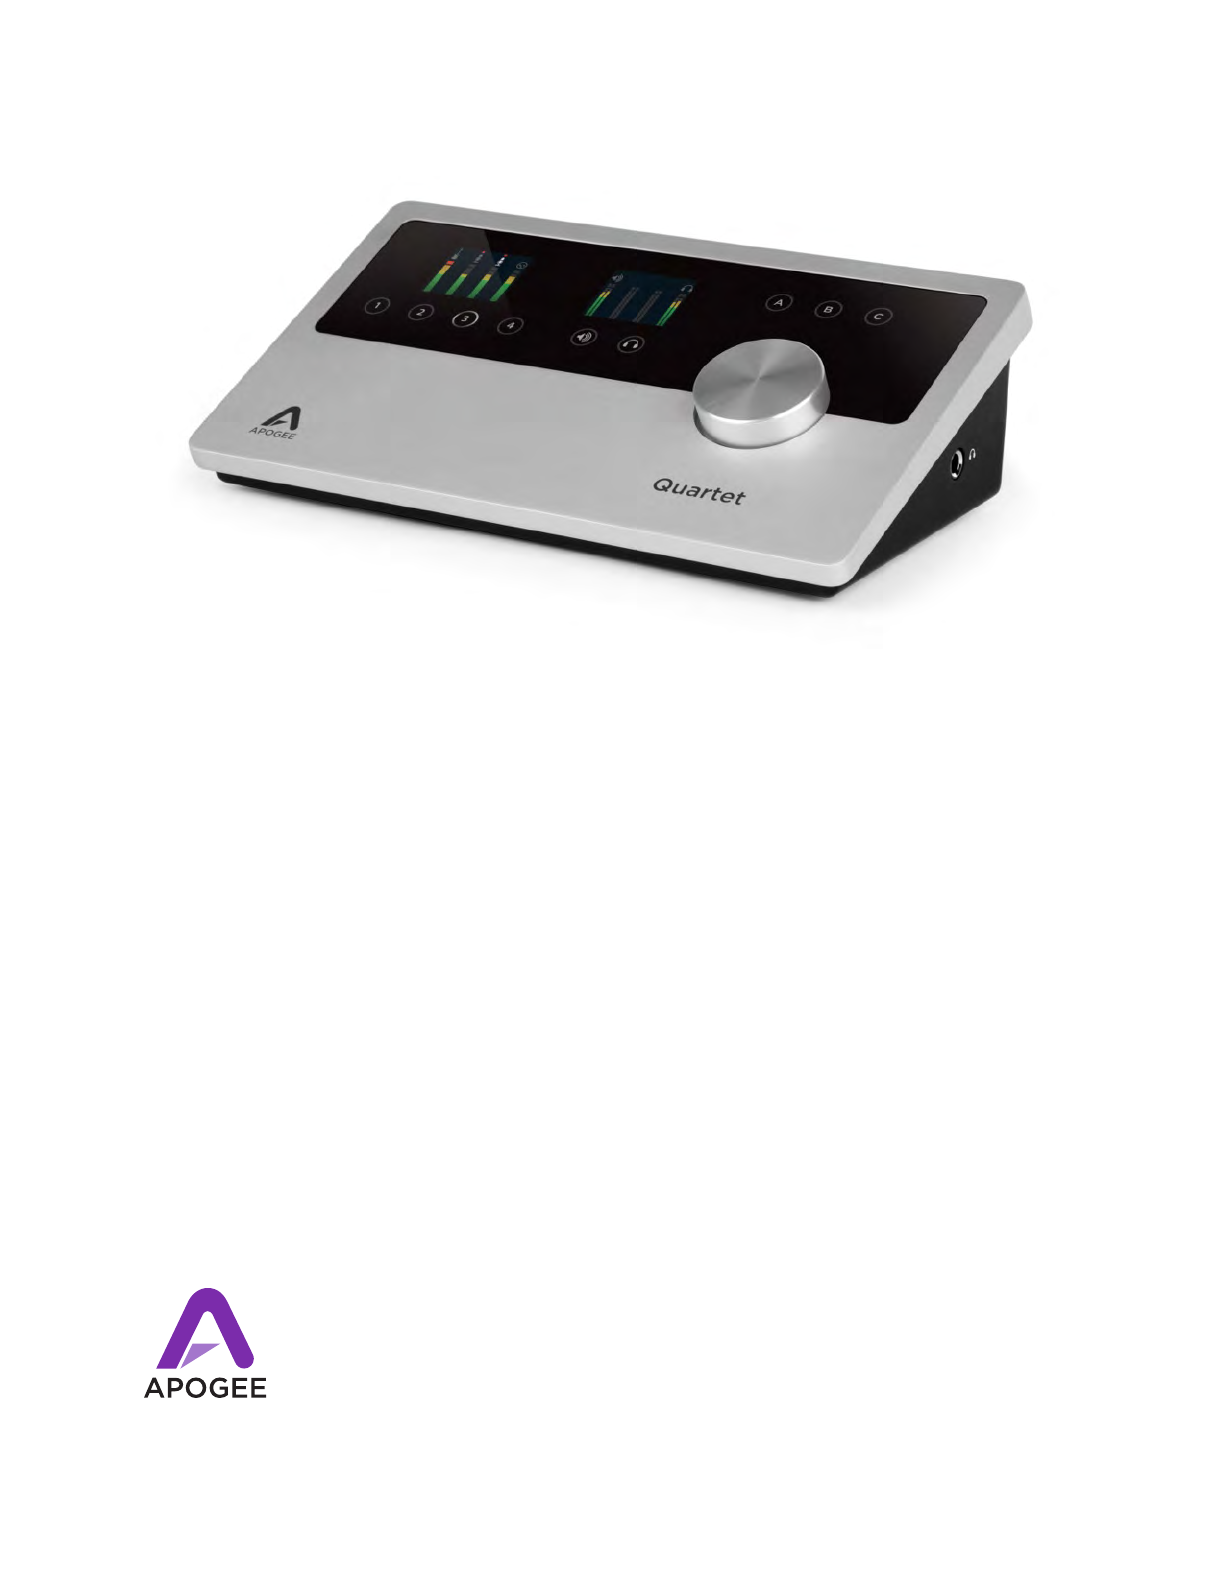
Quartet panel tourTop panelInput Meters Output MetersUser Assignable TouchpadsController KnobDurable Cast Aluminum BodyInput Selection TouchpadsOutput
Rear panelAnalog OutputsAnalog InputsDC PowerWord Clock OUTUSB 2.0Digital InputsMIDI (USB)Side panelHeadphone Output(on right side)QuickStart - Apogee
Related products and manuals for Serial switch boxes Apogee Quartet
 (7 pages)
© 2020, manymanuals.com. All rights reserved. | 0.558 s |
 Manymanuals.com
 Manymanuals.de
 Manymanuals.fr
 Manymanuals.it
 Manymanuals.pl
 Manymanuals.cz
 Manymanuals.es
 Manymanuals-pt.com
Comments to this Manuals